Thursday, May 23, 2013

Photoshoot!


A few months ago I was contacted by a photographer from Frostbite Media about doing makeup for a photo shoot she had in mind. I was so excited and beside myself that someone loved my work and wanted me to be a part of their project.

The shoot itself was for portfolio work with the theme of fashion and beauty. I was given full control of the makeup and was basically told to go crazy! How awesome is that! With the focus on dramatic makeup, I immediately started working on some ideas I had in mind. Once I had received head shots of the models, I then modified my ideas and makeup looks to suit each model.

The first look was inspired by peacocks, as the model, Nyree, absolutely LOVES them. It was really fun to play around with peacock inspired colours and see what combos and placements worked better. This is how  the final images turned out! I also made the peacock lashes myself :P


The second model, Em, has gorgeous fair skin, green eyes and red hair, so I knew I wanted to do something smokey on her. With bold, graphic eyeliner being a trend lately, I took that into account and incorporated  that into my idea. Take a look below!


Finally, we have the third model, Jess. This girl wasn't the original model we had planned on using. The original girl ended up having to work that day, which we didn't know until we arrived. Jess is a friend that happened to be there on the day and was able to fill in for us. She doesn't normally wear makeup at all, so I had to tweak my planned look to make it more suitable for her. I think I did a pretty good job! :)


Is anyone interested in what products I used?
I would love to know what you think, leave a comment below!


Thanks so much for looking!
xx Sarah xx


Tuesday, May 7, 2013

Femme Fatale Twilight Meteorite


I recently gave in to temptation and bought some Femme Fatale nail polishes after seeing gorgeous pics plastered on my facebook wall. Let me just say, I do not regret regret this purchase! 

Twilight Meteorite is described as "a rich plum pink base with bold blue>pink duochrome flecks".

This description is pretty on the money!

Just look at the photo's!


Gorgeous huh?

To exaggerate the duochrome finish, I applied a black gradient as a base underneath, so it fades out to nothing at the tip where you can see Twilight Meteorite on its own. 

I am absolutely in love with this polish and keep catching myself looking at how gorgeous it is. It applied with ease, not too thick nor too thin, not streaky and dried quite fast. I applied two coats to make it fully opaque.

I also love that Femme Fatale are Aussie! 


Here are some other polishes I also picked up, they are sooo pretty!


I will post more pics/reviews when I use the others!

Have any of you tried out Femme Fatale polishes or cosmetics? Let me know what you think!

Thanks for reading!

x Sarah x

Monday, May 6, 2013


Violet Vibes

This is a look I filmed originally as a valentines makeup look, but it can really be worn anytime. It is definitely my kind of look! Gorgeous purples and lots of glitter!


Let me know what you think! 

Products:
  • Mac Painterly Paintpot
  • Urban Decay Psychedelic Sister 24/7 Liner
  • Sugarpill Poison Plum and Love+ (mixed together)
  • NAKED Cosmetics Ivory Stack - Red duochrome
  • Sugarpill Bulletproof
  • Maybelline Line Stiletto (discontinued :( ! )
  • Mac Haute & Naughty Mascara
  • LA Splash Gaudy Glitter


Video below!


Thanks for reading!
x Sarah x

Disney Series! Maleficent!

MALEFICENT!

Now I know doing a series of makeup looks based off Disney characters is hardly a unique idea, but it is certainly a good idea, and a fun one at that. So I'm going to do my own take on these looks!

I kicked this series off with a look based on Maleficent from Sleeping Beauty.


Products:
  • Painterly Paintpot
  • Sugarpill Acidberry on lid
  • Sugarpill Poison Plum in crease
  • Sugarpill Dollipop above crease
  • Sugarpill Bulletproof to deepen
  • Lime Crime Citreuse Uniliner on lower lashline
  • LA Splash Phenomenon glitter also on lower lashline
  • Elise Individual Eyelashes #676 (rainbow)
  • Inglot #77 Gel Liner


 I would love to know what you think about this look! 

If you recreate it, let me know. I'd love to see it!


Thanks for reading!
x Sarah x

Saturday, May 4, 2013

I'm Backkkkk! + new site!

Helloo all my followers!


It's been so long since I posted here, but I'm finally back! 


About 3 days ago I launched my new website! This is where I will be posting all my work, including fashion/editorial makeup, wedding makeup and any other fun looks I do. I also plan to post my looks here on the blog with more info on products used and then link back here from my site!


www.sarahmoymakeupartist.com


A couple of weeks ago I did a photoshoot (my very first!!!) and it was sooo much fun! The focus was on dramatic makeup and I pretty much got to do whatever I wanted makeup wise. There are a couple of preview shots on the site, but when I get the final images I will be uploading those too. I also have a couple of weddings lined up for next year, how cool!


Along with makeup looks, I hope to get into the habit of posting reviews for you guys. What else do you want to see? I'd love to hear your feedback.


I just want to say thankyou to everyone who has followed my posts, commented and shown support. I feel like I'm really starting to move forward with my makeup and it's so exciting!


Sarah xox

Sunday, December 11, 2011

Nail Art!


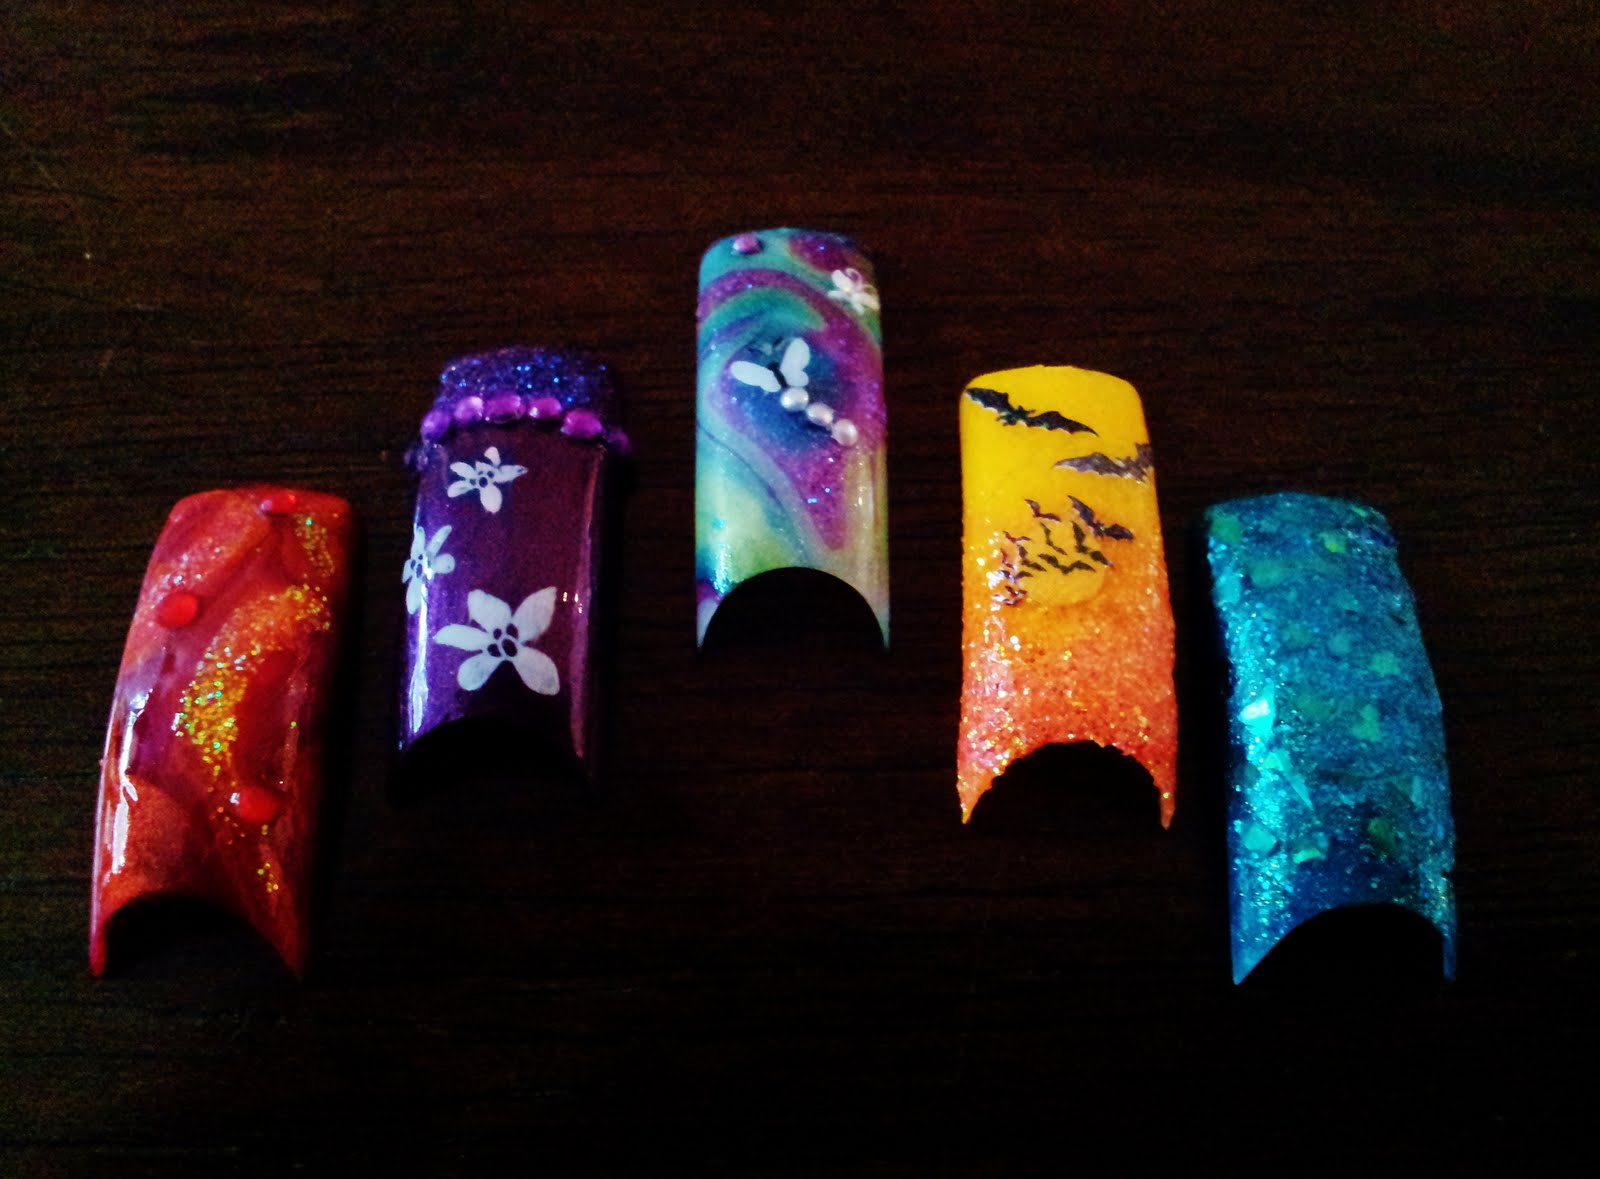
This is what I did for a TAFE Nail Art assessment a couple of weeks ago. Considering I've never really done much nail art, I was quite impressed with my efforts and pleased with how it turned out.

We were able to base our assessment on anything we desired, whether that be christmas, easter, halloween, nature, star signs, etc. I wanted to do something bright, fun and exciting, so I based mine on COLOUR.

Anyway, I hope someone at least finds this interesting. Let me know what you think :)

Products Used

· Revlon Red Nail Polish

· Sally Hansen Orange Nail Polish

· China Glaze Neon Orange Nail Polish

· Bright Orange Glitter

· Red Rhinestones

· Paper Cup with Water

· Toothpick

· Clear Top Coat

1. Create the water marbled pattern by dropping balls of each nail polish colour one by one onto the surface of the water in the paper cup. Start with the red, then place the orange inside the red, then the neon orange inside the regular orange. Repeat this 2-3 times.

2. Use a toothpick to swirl the colours and create your desired pattern.

3. Dip the nail into the water through the nail polish design on the surface. Wipe away excess polish with your toothpick, then remove the nail and sit to dry.

4. Once dried, precisely paint a swirl of colour from the marbled effect with clear nail polish.

5. While it’s still wet, sprinkle some orange glitter over the top.

6. Add some red rhinestones to jazz up the design.

7. To complete, seal with a coat of clear nail polish.

Products Used

· Purple Nail Polish

· Purple Rhinestones

· Purple Glitter

· Konad Nail Art Stamping Kit

· Clear Top Coat

1. Paint the nail with 2 coats of purple nail polish.

2. Once dry, paint the tip with clear nail polish.

3. While still wet, sprinkle the tip with the purple glitter.

4. Then go ahead and add purple rhinestones across the smile line when the glitter stops.

5. Now using konad nail art stamping kit, add the flower design.

6. Complete the nail with a clear top coat.


Products Used:

· Purple Nail Polish

· Green Nail Polish

· Teal Nail Polish

· Purple Glitter

· Nail Art Stickers

· Nail Pearls

· Paper Cup with Water

· Toothpick

· Clear Top Coat

1. Create the water marbled pattern using the purple, teal and green nail polishes using the same technique as the red nail.

2. Place a butterfly nail sticker in the centre of the nail.

3. Paint over a coloured swirl with clear top coat and sprinkle with purple glitter while it’s wet.

4. Add a smaller butterfly sticker to the design.

5. Place the mini nail pearls as a trail from the main butterfly. Add any extras to the design as desired.

6. Finish with a coat of clear top coat.


Products Used:

· Neon Orange Nail Polish

· Orange Nail Polish

· Orange Glitter

· Bright Orange Glitter

· Nail Art Stickers

· Makeup Sponge

1. Using a makeup sponge, place some neon orange nail polish on one corner and dab onto the top half of the nail.

2. Repeat this step with the regular orange nail polish starting from the bottom and working up to the neon orange.

3. Work back and forth between the 2 colours to get an even gradient.

4. Place the bat stickers as desired

5. Paint a layer of clear top coat to the bottom of the nail and carry it up the sides of the nail around the stickers.

6. While still wet, sprinkle the orange glitter across the very bottom of the nail, then sprinkle the brighter orange glitter so it overlaps the previous glitter then fades up towards the tip.

7. Complete with clear top coat.
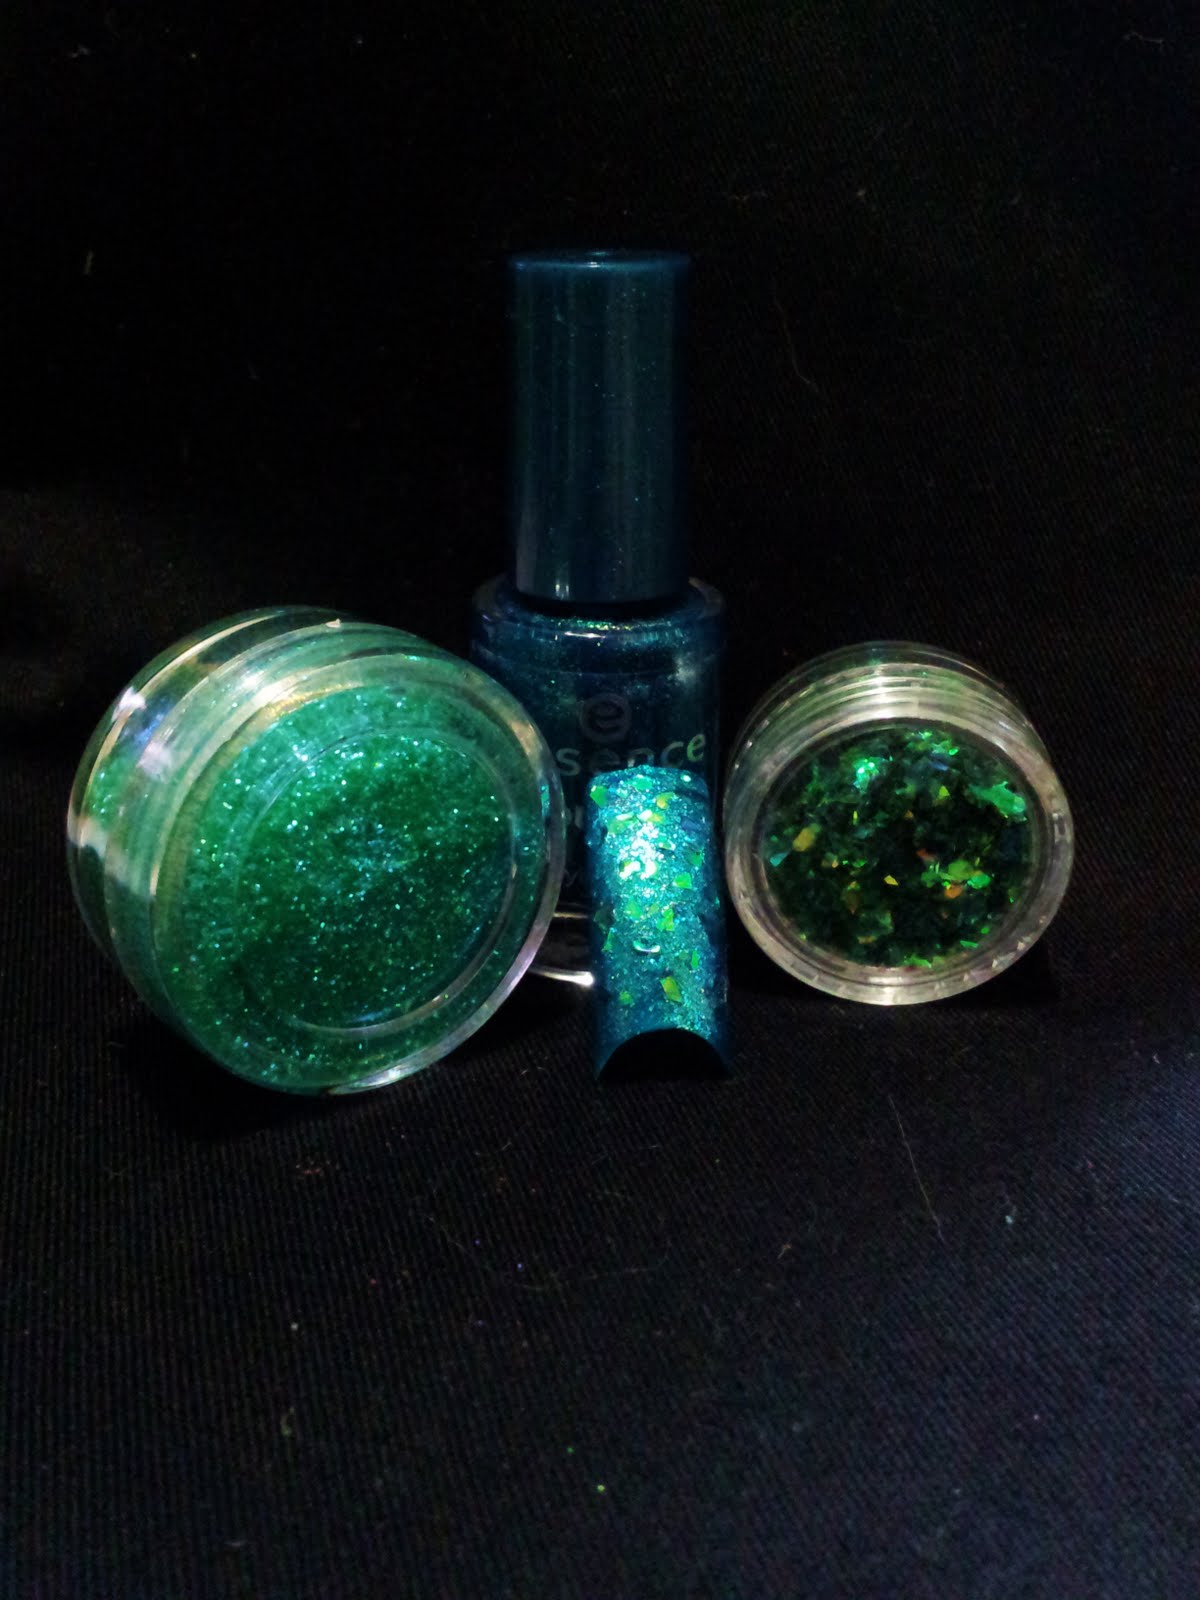
Products Used:

· Teal Nail Polish

· Teal/Aqua Glitter

· Reflective Green Mylar Flakes

· Tweezers

· Clear Top Coat

1. Paint the nail with 2 coats of teal nail polish.

2. While the 2nd coat is still wet, sprinkle the glitter over the entire nail.

3. Once completely dry, paint a thick layer of clear top coat.

4. While it’s wet, use tweezers to pick up and place small pieces of mylar to create a broken mirror/discoball effect.

5. To finish, paint 2 thick layers of clear top coat.


Thanks for looking!

xx

Friday, December 2, 2011

MAC Glitter & Ice Smokey Eye Tutorial


Hellooooo lovely followers!

It's such a miserable day here today. It's the 2nd day of summer and its cold and cloudy.

I have made a new tutorial for you guys! This is a look inspired by MAC's holiday glitter and ice collection. Hope you all like it!


EYES:
  • MAC Let's Skate Paint Pot
  • MAC For Effect Paint Pot
  • Wet N Wild Greed Palette
  • MAC Reflects Pearl Glitter
  • MAC Industrial Pearlglide Eyeliner
  • MAC Fresh Ice Mineralize Eyeshadow
  • MAC Shimmermint Mineralize Eyeshadow
CHEEKS:
  • MAC Blushbaby Blush
  • MAC Snowglobe Beauty Powder
LIPS:
  • MAC Secret Lover Lipstick
  • MAC Pleasure Principle Dazzleglass

I'd love to hear what you think about this look!
Here's the tutorial:


Thanks for stopping by!
xxx